Showing posts with label kitchen. Show all posts

Tuesday, April 2, 2013

Herbed Crackers

food blogging 017

What to make when the markets are dry of fun fruits and vegetables? What’s left when there isn’t inspiration found in seasonal bounties? Onions are always a possibility. The other steady option is flour. And once you get starting becoming friends with flour, and learning about the delicate and amazing qualities of yeast, flour is fun to explore. It rises and bubbles and makes the most delicious of delights. You can punch it and pull it, and it will bounce back and be even better.

I always thought cracker recipes were overrated. Who wanted to toil making such an easily obtainable and shelf stable product? Aren’t Wheat Thins or Carr’s Water Crackers good enough? And selling at $6 a packet, I would never buy herbed flatbread crackers. But I did have some fun making  them! And truth be told, they aren’t the same as Triscuits, Wheat Thins, or Carr’s. They’re in a ballpark of their own.

Ingredients:

1 cup warm water (about 110°F/43°C)
1 teaspoon active dry yeast
3 cups (15 oz) all-purpose flour, plus more for rolling
3 TBs of extra virgin olive oil
2 tsp coarse salt
1 teaspoon sugar
1 large egg whisked with 1 tablespoon water, for egg wash
sea salt, for sprinkling
1/4 cup minced herbs, I used fresh minced rosemary & thyme

First, activate the yeast by combining the warm water, yeast and sugar. Once it has become foamy, stir in the flour, oil and coarse salt until a dough forms. knead the dough about two minutes, adding as much flour as necessary for it to become smooth and not sticky. Put dough in an oiled bowl, cover and allow to rise for about an hour or until it doubles in volume.

Preheat oven to 350°F. Turn out the dough on your work surface and divide into 16 equal portions. Roll out each piece on a floured surface until very thin, approximately 4"x10". Place rolled out sheets onto parchment lined baking sheets. Continue to roll out all dough and then brush with the egg wash and sprinkle with sea salt and herbs.

Bake, rotating sheet halfway through baking, until crisp and golden, 18-22 minutes. Let cool on the baking sheet then transfer to a wire rack to cool completely. You can keep the crackers in an airtight container at room temp for up to 1 month, or Freeze for up to 3 months. It is important that the crackers cool completely before storing though, as otherwise they will become stale quickly. 

Sunday, February 24, 2013

Roasted Tomatoes Pomodoro Al Forno

food blogging 014

When I was little, I didn’t care for tomatoes. I would order my hamburgers and chicken club sandwiches “with no tomatoes. ” Ketchup and tomato sauce were of no issue, of course. But the actual unmodified fruit was not to be consumed by yours truly until I came into my mid-twenties. In childhood, I was also “allergic” to apple sauce, but that’s a different issue entirely.

Once into adulthood, I realized my prejudice against tomatoes lay strongly in that my mother always ordered everything “with no tomatoes.” In the pursuit of a diverse and appreciative palate, I started eating tomatoes. And I liked them.

I’m not saying I like every tomato. Like many, I feel tomatoes are best avoided in winter when they are typically mealy from being grown hydroponically and without the sunshine and natural settings that produce the juicy, umami filled tomato of the summertime.

But what about during the winter months? Take heart, my fellow tomato lover – there is still a way to enjoy the delicious tomato. In fact, I think this recipe will give a summer tomato a run for its money. And truthfully, it all lies with the humble can of whole plum tomatoes. With a little time, and olive oil, these tomatoes are so delicious; you may be able to wait until summer.

Tomatoes Al Forno

Based off Molly Wizenberg’s recipe featured in Bon Appetit.

  • 2 - 28 ounce cans of peeled whole plum tomatoes
  • 1 Cup Olive Oil
  • 1.5 teaspoons dried oregano
  • ¾ teaspoon sugar
  • ½ teaspoon salt
  • 2 garlic cloves
  • 1 tablespoon minced fresh parsley
  • Crackers or toasted baguette, for serving.

Preheat the oven to 250°F. Pour half of oil in a rectangle baking dish. Half and seed tomatoes, laying cut side up in the pan. Drizzle with remaining oil. Sprinkle with sugar, salt and oregano. Cook for one hour, then flip the tomatoes over in the pan. Cook another hour. Remove from pan and into a smaller dish, keeping tomatoes covered in oil. Enjoy with crispy bread or crackers (I enjoy them with triscuits).

Joy to your World,

Elizabeth

Friday, April 27, 2012

Tea Party

IMG_0351

Tea Parties. The word itself conjures so many images. Images of ruffled summer dresses and lace gloves, miniature treats and dainty tea sandwiches, holding a cup with one’s pinky up, or perhaps even the fantastical party of the Mad Hatter in Alice’s Wonderland?

IMG_0376

This weekend I hosted a tea party. I borrowed some family heirlooms and had the occasion to use some of my own, and we enjoyed our fancy tea to celebrate a bride-to-be. The fare consisted of tart cherries scones, with lemon curd & clotted cream, and three types of tea sandwiches, with tea biscuits and petite fours. The tea sandwiches were of three varieties: egg salad, cucumber & strawberry.

IMG_0360

So we nibbled and drank tea with our pinkies up. I only felt like the mad hatter once when I burnt myself by accidentally touching the hot silver teapot top! It was nonetheless lovely to enjoy tea with the ladies.

To create the fanciful tea sandwiches, simple mix together this general spread and spread as little as possible to coat both sides of sandwich bread, add some paper thin slices of whatever you like (strawberry, cucumber, radishes, etc.), and then cut the crusts off!

Tea Sandwich Spread

  • 1 8oz block cream cheese
  • 1/2 cup peeled & seeded cucumber, diced fine
  • 1/4 cup minced red onion
  • 1/3 cup mayonnaise
  • 2 TB fresh herbs – tarragon, basil, parsley or mint

Thursday, April 19, 2012

CSA Box #1


Today I received the first box from the Community Supported Agriculture (CSA) subscription, offered by The Produce Box, that we joined.

This CSA seems so different from the one previous bad experience I've had. In that prior experience, it was through one farm directly that charged you up front in the off-season. This came with a hefty tag of ~$600. At that time, it didn't seem prudent. Additionally, that farm's CSA did not offer any choices and would deliver whatever the farm could at that point - which was a nightmarish concept after many friends relayed stories of getting boxes full of the same undesired vegetable week after week.

So happy was I to realize that The Produce Box is actually a network of farms that offer you weekly Box Choices an the potential of skipping weeks. Adding to that you have the luxury of paying as you go, without any obligation to pay for the skipped weeks. I'm happy so far! And they even included a nice newsletter with recipes and farm news. So I'm glad that we’re getting to experience this fun farm-to-table shopping. This weeks rundown is:

  • 1 large bunch spinach
  • 1 large head Romaine
  • 2 quarts strawberries
  • 2 (greenhouse) cucumbers
  • 2 (thin) carrots
  • 6 sweet potatoes
  • Cost: $23
 

Wednesday, April 11, 2012

Simple Spring Eats

iphone march 2012 015


Springtime is one of better seasons innately because it ushers in a new season of fresh produce. By late March, aren’t the first ripe strawberries of the season (from Elodie Farms at the Saturday Durham market) a happy sight? Sprinkled with a little homemade sucre vanille they are a luscious dessert!

Asparagus seems to be on sale at all the supermarkets, such a pocket friendly treat in the height of its season. We like to grill it crispy with salt and pepper. Roasted in the oven it is a lovely way to heat the house in winter – but now I’m looking forward to keeping that heat outdoors and welcoming the Grilling Season!


Best yet, simple tartines made from the deliciously charred “market bread” from Loaf, slathered with nutella, butter and fleur de sel, or cream cheese are the best way to break fast in the morn. Simple gourmandise at its best.

Joy to your World,

Elizabeth

Sunday, April 8, 2012

Happy Easter!

Happy Easter!! Hope you and yours enjoy some Easter ham and celebrate the Risen Christ!

Joy to your World,

Elizabeth

Saturday, February 4, 2012

La Chandeleur: un histoire

La Chandeleur Feb 2 12 007

La Chandeleur was yesterday. It’s a French holiday which translates to Candlemas. La Chandeleur has a few names, actually. This day is also known as “Groundhog’s Day” in American & Canada and also marked as both la Fête de la Lumière/Feast of Lights, and La jour des crêpes/Day of Crêpes. It is widely celebrated throughout la francophonie as THE day to eat crêpes. Once, it even marked the official start of the “crêpe season.”

This year, we fêted La Chandeleur at our house and my cousin taught me the tricks. And really, they truly aren’t difficult to make. I had tried when I lived in France, and even at home after, but I never had much success until my cousin showed me how. Turns out, it is very simple. Using stuff you probably already have, you can make fantastic crêpes at home. And one recipe will make about 20, so, like the French, you can keep a stash of crêpe in your house for a day, or two after this fun holiday.

Even without making crêpes, the history behind La Chandeleur is fascinating. It is always fêted on Feb. 2, a feast day in the Catholic calendar which commemorates the jewish ritual cleansing and purification of the Virgin Mary after having given birth and more importantly also marks the presentation of baby Jesus at the temple/to the world officially. So, this day also is celebrated as the “Fête de la Lumière” or The Feast of Lights, as Chris is the Light of the World. And that is where the crêpe comes in. The humble crêpe. The crêpe is yellow, hot and golden, like the sun, which therein reminds us of how Christ is the Light of the World. So, as this message is very important, it’s important to remember it. And thus the fun thing about the day is it is believed to ensure a lucky year, il faut manger des crêpes / one must eat crêpes!

Really? Truth be told, a lot of French folks don’t recall why they eat crêpe on Feb. 2 each year. Because not only do you eat crêpes (and therefore drink low-alcohol, very drinkable cidre) but it’s also a day of predictions (and sometimes games). La Chandeleur is also in fact the basis for the secular American “Groundhog’s day” which is also a day to make predictions about the coming year.

Historically though, the crêpe season season (as all food was seasonal during these times) would go on until Mardi Gras/Fat Tuesday, when just before lent everyone would gobble up their remaining crêpe before fasting. Therein, the source of the tradition of eating pancakes on Fat Tuesday, as crêpes are often referred to as “French pancakes.”)

So, to make the crêpes you just have to call out the big guns: patience and those fingertips. The crêpe batter is the easiest thing in the world (thanks, Alton). The trick is to quickly rotate the pan to cover it evenly (a hole or two will not ruin it), ideally a full shot glass used on a ~10” nonstick surface. Then, wait. Once it begins to curl (you can aid it by nudging the edges with a spatula), slide your spatula under to loosen it and then get in there and just flip it over by holding on with your fingertips.

In France, they also have cute sayings for La Chandeleur that rhyme. These rhymes draw a clear reference to the secular American holiday of Groundhog’s day.

They are also fun to say. Try them out:

Rosée à la Chandeleur, hiver à sa dernière heure / Dew on Candlemas, winter at its final hour

À la Chandeleur, l'hiver cesse ou reprend vigueur / On Candlemas, winter ends or strengthens

À la Chandeleur, le jour croît de deux heures / On Candlemas, the day grows by two hours

Chandeleur couverte, quarante jours de perte / Candlemas covered (in snow), forty days lost

Joy to your World,

Elizabeth

Tuesday, December 6, 2011

Go Green with your Chicken Stock

IMG_0602

Buying chicken stock at the grocery store can be expensive. Sold in many forms, as a concentrated paste or in cubes or cans. It’s an oft called for ingredient that both takes a chunk out of your dollar and causes a lot of waste in the environment if you prefer liquid broth which comes with wasteful cans or cartons. My method is an environmentally friendly way of creating your own chicken stock from items you obtain naturally in your kitchen.

If you cook, you may frequently have left over bones from roasting meats. I suggest that you look upon these bones with purpose. They can help form the basis for many future meals! They will provide great flavor and save you money, too.  If you roast a chicken every month and use the carcass for making stock, you will always have free stock (unless you make soup everyday).  It also makes the house smell lovely.

Just add your bones in your biggest pot and add some halved onions (even leave the peels on them!) maybe throw in a carrot or some celery and toss it all in the pot, and fill the pot up with water. Add 1 tsp per quart of salt, a couple bay leaves, and about 8 peppercorns. Let the pot simmer for a few hours. Drain, and allow to cool for a couple hours before transferring into Tupperware and into the freezer.

You’ll be set with free chicken broth in your freezer ready to defrost in the microwave and add to your dish. You can even freeze the broth in muffin tins or ice cube trays for miniature portions when you just need so much.  Do you make your chicken stock at home, yet?

Monday, January 17, 2011

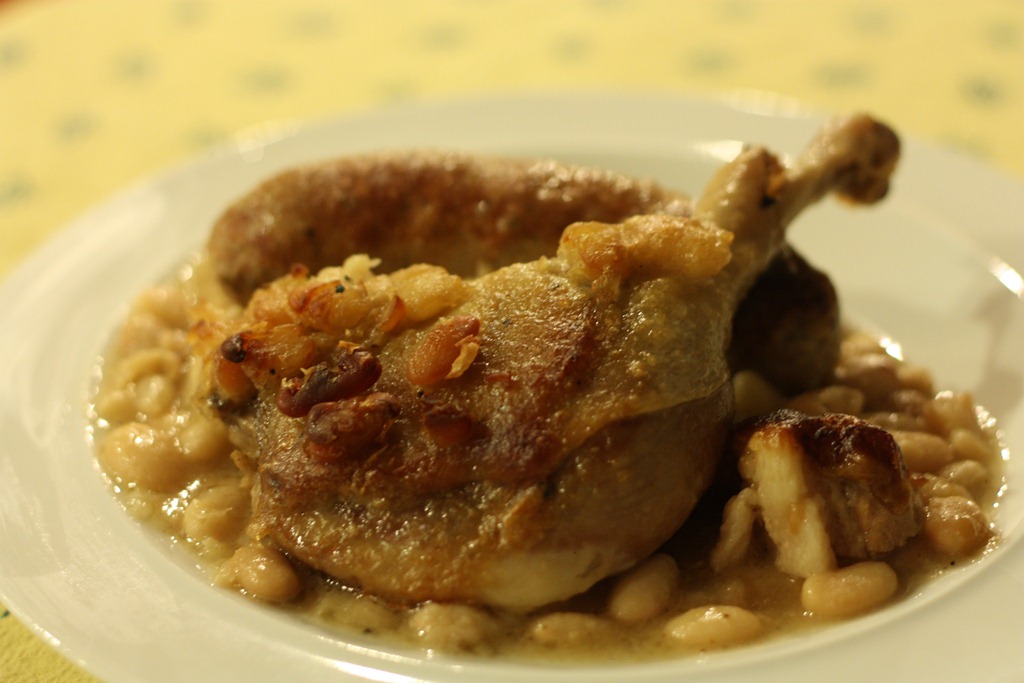
DC Challenge: Cassoulet

Cassoulet 223

This most recent Daring Cooks challenge was truly a feat. Over three days, finally we feasted on the end product, a homey comforting French meat and beans dish called Cassoulet. In France, a traditional cassoulet contains preserved goose, sausages, pork and beans. More contemporarily, duck confit will be used in lieu of the goose. This challenge was comprised into three parts: preparing the duck confit, pre-cooking the beans, and finally creating and baking the cassoulet over the period of two days.

Wednesday, January 12, 2011

Pork Belly Carbonara

IMG_8340

Rich creamy noodles with delicious succulent pork belly accented by snappy snow peas. Tonight, we enjoyed this delicious pork belly carbonara. This pasta recipe is an indulgent take on an easy favorite.

Monday, March 8, 2010

a savory start

IMG_1354

This past weekend, we had the great pleasure of celebrating my grandparents’ fiftieth wedding anniversary. At a family brunch in their honor, my aunt made her fantastic Shrimp & Grits. She uses stone-ground grits and simmered them with chicken stock, cream and cheese. And one fortuitous byproduct of the happy event were a lot of leftover grits.

As my grandparents fervently attest, if the grits are packed in a container overnight they become sliceable. My grandparents prefer a glass sprayed with PAM; I used a tupperware completely filled to good success. And with those slices of grits mingling in a hot oiled pan, you can make the most delicious Grit-Cakes. 

Paired with a fresh fried egg and some tomato sauce, you have  savory start to the morning. Add some leftover roasted potatoes and it’s a delectable hash.

Saturday, July 4, 2009

Oven Ribs

Yes. These were made in an oven.

Take your raw baby back ribs and put them in a high-sided, oven-safe pan. Fill the pan up with about an inch of water. Add 1/4 C apple cider vinegar to the water. Add the plain, raw ribs into the pan. Cover the pan tightly in aluminum foil, crimping the edges so that no steam escapes.

Put them in the oven for an hour at 225 degrees F.

Remove Ribs from pan and onto a jelly roll pan. Coat the ribs in your choice of BBQ sauce. (We used Sweet Baby Ray's Sweet n' Spicy sauce)

Put the pan on the second to top rack in the oven under the broiler. Broil until bubbly. Remove and baste again with sauce. Replace pan under the broiler. After about 5 minutes under the broiler, these babies are ready to be separated and devoured.


Monday, May 25, 2009

Risotto Cakes

Back when I made my Beer Can Chicken, I saved the carcass and boiled it in water all night with an onion and some celery. It made the most flavorful stock. I filled Ziplock bags and froze that flavorful stock and began having dreams of using it to make risotto for the first time.

There were the most beautiful English Peas at the market the other day. I happily shelled my peas and knew I would put them in with the risotto. Another addition was bought at the store, a lovely ear of corn. So with my stock, corn & peas, I was going to have a lovely risotto

It was a great risotto in fact, but too much for just F. & me. So I spoke with my most trusted source, my grandmother on whether you could freeze risotto or not. She told me in fact she freezes individual tablespoons of risotto to make Risotto Cakes.

And that’s what I did. I lined a cookie sheet with some wax paper and scooped heaping tablespoons of my risotto mixture. Then, I stuck them in the freezer overnight.

When my lovely Matron of Honor came over for dinner the other week, I knew just what I’d make as my premier. I took the frozen cakes out and let them thaw about 5 minutes. Then, they took a quick dip in an egg wash, and into a mixture of homemade breadcrumbs & panko breadcrumbs before hitting the hot oil in a sauté pan.

Ten minutes later…

Friday, April 10, 2009

Pineapple Pavlova

In April's Gourmet this month, they feature a Berry Pavlova (meringue with lemon curd topped with ... you guessed it: berries!). My F. doesn't care overly for berries though, so I made ours with pineapple. Though not as photogenic, this Pineapple Pavlova was really divine.

First comes making the meringue:

3 egg whites
pinch of salt
3 tb. cold water
1 Cup superfine granulated sugar
1 TB cornstarch
1 ts rice wine vinegar

Let the egg whites come to room temperature for a half hour and mix cornstarch and sugar together. Then, add the egg whites to your mixer on medium with a pinch of salt to arrive at soft peaks (about 6 minutes). Add water, and re-arrive at soft peaks (another 3 min. or so).

On medium high speed, gradually add tablespoon by tablespoon of the sugar mixture to the egg whites. Let the mixture go for another minute after incorporating all the sugar mixture. Add the vinegar and continue to mix for another 5 min. or until glossy with stiff peaks.

Spread the mixture onto parchment paper and stick in a 300 degree F oven for 45 min. When the time's up, open the oven door and let the meringue cool undisturbed for an hour.

Meanwhile... make the lemon curd!

1 C sugar
6 TB room temp. butter
2 whole eggs
2 egg yolks
1/2 C fresh lemon juice

Cream sugar and butter together over medium speed in your mixer. Then, add the eggs until incorporated. Finally add the lemon juice. (The mixture may look lumpy)

Put the mixture in a heavy bottomed saucepan. Stir constantly over medium low heat. The butter may separate out a little before it's all warmed. No worries, keep stirring over medium low heat until the mixture reaches 170 degree F. This will take 25 minutes or so, so get comfortable. Once it reaches 170, you're good to go with delicious lemon curd.

Then it's easy as pie to assemble. Remove the meringue onto a dish, spoon lemon curd in the center crater of the meringue and then top with pineapples.


The Pavlova is really fabulous. There's a layer of the meringue that's crisp and brittle, and then the center is luxuriously marshmallow-y. Enjoy!

Thursday, April 9, 2009

Potatoes Gribiche

Recently, one of the blogs, The Wednesday Chef , featured a recipe that is also on another blog I read, Chocolate and Zucchini. And since this latest reference to this recipe, I've found myself desiring it: Potatoes Gribiche. Potatoes tossed in a sultry smokey paprika vinaigrette spiked with pickles and salty. The thoughts whirled until I had to make it. At 1am, bien sur.

While the original recipe is much larger - I was only cooking for myself at past midnight. Also, I lacked the shallot & capers the original recipe call for. However, I fancy my recipe was quite tasty in it's own right.

Warm Potato Salad

1. Roast - 2 hand size Yukon gold potatoes cubed & tossed in olive oil, sprinkled with salt and pepper at 425 F for a half an hour.

2. Mix - 1 chopped hard boiled egg, three minced baby dill pickles, 8 manzanilla olives, 1 ts. sherry vinegar, 1/2 ts. Dijon mustard, 1/2 ts. dried onion, 1/4 ts. granulated garlic & 1/4 ts. smoked Spanish paprika

3. Toss them together & Enjoy!

Sunday, March 8, 2009

Beer Can Chicken


Beer Can Chicken


Take one 5 lb chicken and give it a good rinse and one over, plucking off any yellow outer skin hanging on or feathers. Sit the Chicken on a ¾ full open beer (we used Miller Lite). Rub the chicken of a mixture of ~1/4 C olive oil, 3tb salt/spice mixture.

To make potatoes on the side, par boil 1 lb. halved red new potatoes for about 5 minutes. Then drain and toss with a blended mix of 4 tb. Olive oil and half of a packet of onion soup mix. Arrange the potatoes around the chicken.

Cook the chicken dish in the center of a 325°F oven for an hour.

After an hour of cooking the chicken (once it reaches an internal temp of about 130°F) prepare the glaze.

We used a small bottle of Orangina type juice drink, the juice of half a lemon and one lime, ¼ ts fresh ground ginger, red pepper flakes & cayenne pepper, finished off with a nice dredge of honey. Let your glaze ingredients come together for a good half hour then dab it all over with a brush then pour remainder over chicken.

Let the chicken go until it reaches a temperature of 180°F (in the breast, ~165°F in the thigh)

Thursday, January 8, 2009

Crock Pot Pulled Pork

So my mother actually came up with this recipe. My mother doesn't actually like to cook. But I will give her credit when due; this dish turns out great every time. My Fred loves barbeque, and this way was so simple and easy.

Crock Pot Barbeque

At 10 pm the night before take a 5lb boneless and netted pork shoulder and put it in a medium sized crock pot. Add a couple cups of chicken broth and 1/4 cup of apple cider vinegar and a 1/4 ts crushed red pepper flakes. Put the crock pot on "low" and let it go all night.

At 9ish the following morning, turn off the crock pot, and remove the netted pork shoulder to cool. Strain the liquid off and reserve. Clean the crock pot. Once cool, remove the netting from the pork. The boneless shoulder will break apart easy where the bone once was, when this happens, scrape the fatty bits off the meat with a knife, then "pull" the pork apart with two forks.

Put the pulled pork back in to the crock pot with about two cups of the reserved liquid. Let it go until you're ready for a fabulous pork lunch. Serve with steamed buns and a tablespoon of your barbeque sauce of choice.